麦克斯仇
Think different
161
文章
91029
阅读
首页
INDEX
文章
ARTICLE
关于
ABOUT
maven 私服:nexus3 的搭建与使用
创建日期:
2022/11/03
修改日期:
2023/11/02
Java
Linux
Docker
Maven
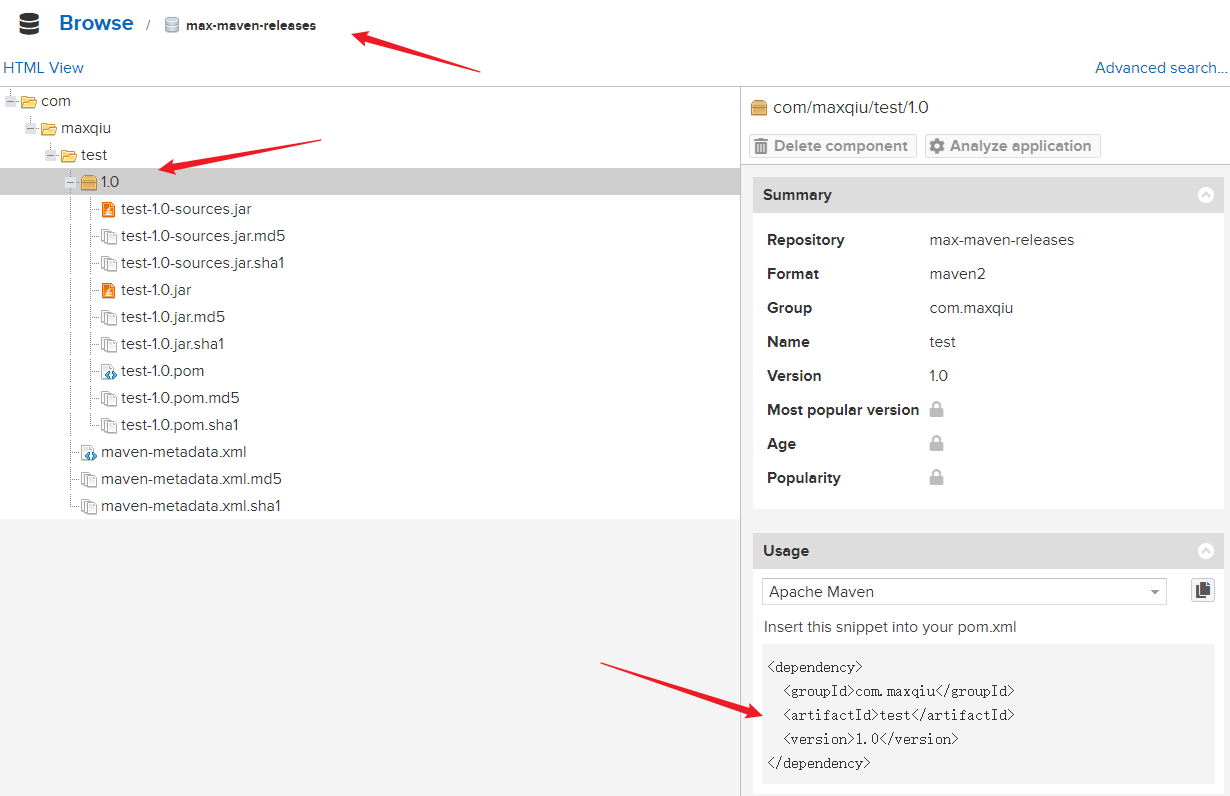
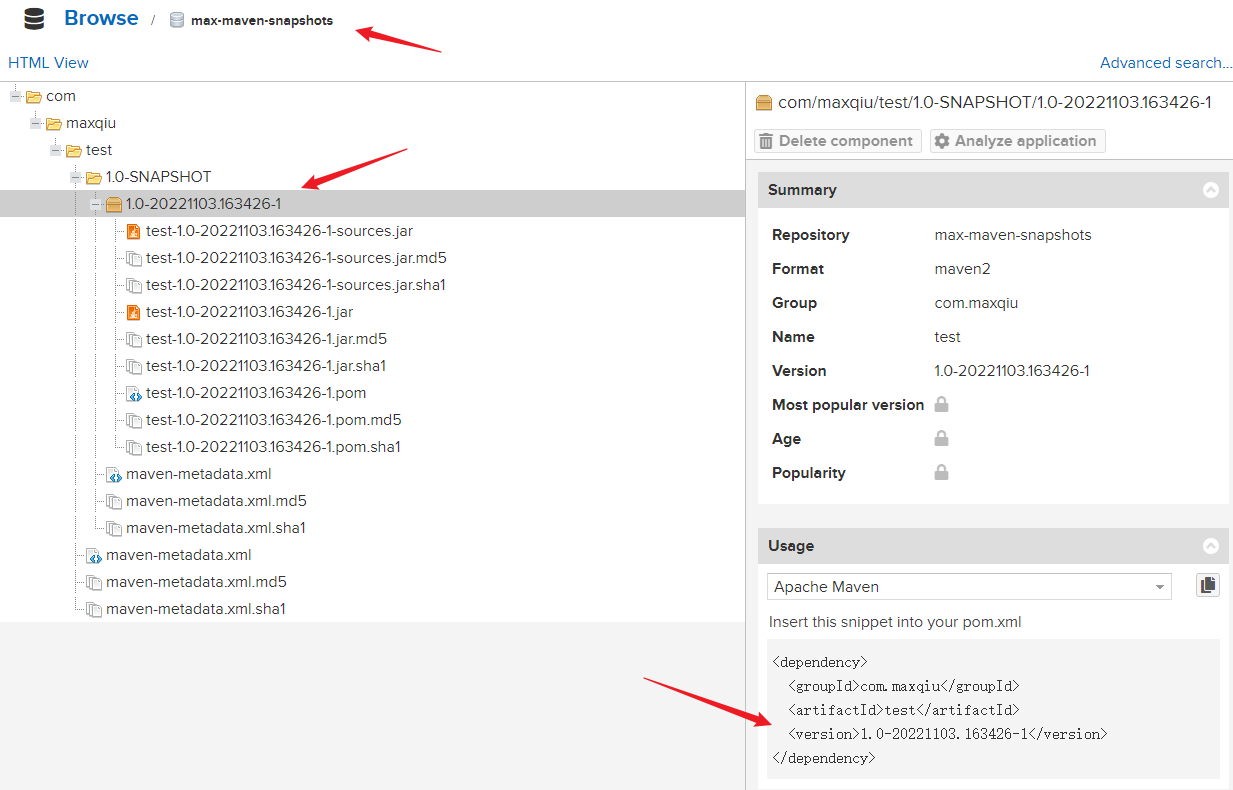
官方文档:[Repository Manager 3](https://help.sonatype.com/repomanager3) 参考教程: - [Nexus搭建Maven私服并使用私服](https://juejin.cn/post/6954983227241005093) - [记录解决maven无法下载snapshot快照库](https://blog.csdn.net/weixin_42447959/article/details/115707521) - [maven 打包源代码 jar 与 jar-no-fork](https://blog.csdn.net/z69183787/article/details/54344493) # 安装 下文介绍了两种安装方式,**宿主机安装** 和 **`Docker`环境安装** ## 宿主机安装(CentOS7) ### 环境准备 `nexus` 需要运行在 `jdk1.8` 环境下,安装 `jdk` 可以参考:[CentOS7配置jdk](https://maxqiu.com/article/detail/4) ### 下载 在官方文档中按如下顺序点击:`Product Information -> Download -> Download Archives - Repository Manager 3` 点击 `Unix archive` 后面的下载链接进行下载并上传 ### 安装 ```bash # 解压 tar -zxf nexus-3.42.0-01-unix.tar.gz # 移动程序目录到指定文件夹并重命名 mv nexus-3.42.0-01 /usr/local/nexus # 移动工作目录到指定文件夹 mv sonatype-work/ /usr/local/ # 删除压缩包 rm -rf nexus-3.42.0-01-unix.tar.gz ``` ### 创建用户并修改文件夹所有者 #### 文件夹权限 ```bash # 创建用户 useradd -r nexus # 修改文件夹所有者 chown -R nexus:nexus /usr/local/nexus/ /usr/local/sonatype-work/ ``` #### 运行者 修改 `nexus.rc` 中的运行者 ```bash vim /usr/local/nexus/bin/nexus.rc ``` 删除注释符并填写运行者,最终内容如下 ```conf run_as_user="nexus" ``` ### 安装为服务 编写服务文件 ```bash vim /usr/lib/systemd/system/nexus.service ``` 内容如下 ```conf [Unit] Description=nexus service After=network.target [Service] Type=forking LimitNOFILE=65536 ExecStart=/usr/local/nexus/bin/nexus start ExecStop=/usr/local/nexus/bin/nexus stop User=nexus Restart=on-abort TimeoutSec=600 [Install] WantedBy=multi-user.target ``` 设置开机自启并启动 ```bash # 重新加载服务文件 systemctl daemon-reload # 开启自启 systemctl enable nexus.service # 服务启动 systemctl start nexus.service ``` 查看启动状态 ```bash # 跟踪日志 tail -f /usr/local/sonatype-work/nexus3/log/nexus.log ``` 出现 `Started Sonatype Nexus OSS 3.42.0-01` 即代表启动成功 ## Docker 环境安装 启动 ```bash # 拉取镜像 docker pull sonatype/nexus3:3.42.0 # 创建数据文件夹并修改权限(此处数据文件夹可自定义) mkdir -p /work/nexus/data && chown -R 200 /work/nexus/data # 启动 docker run -d --restart always --name nexus -v /work/nexus/data:/nexus-data -p 8081:8081 sonatype/nexus3:3.42.0 ``` 查看启动状态 ```bash # 跟踪日志 docker logs -f nexus ``` 出现 `Started Sonatype Nexus OSS 3.42.0-01` 即代表启动成功 # nexus 配置 ## 初始化管理员 1. 浏览器打开网页,默认端口为 8081 2. 点击右上角 `Sign in` 登录 - 用户名为 `admin` - 初始密码在数据目录下的 `admin.password` 文件中,使用 `cat` 命令查看即可,例如: - 宿主机安装时: `cat /usr/local/sonatype-work/nexus3/admin.password` - Docker 安装时: `cat /work/nexus/data/admin.password` 3. 根据页面提示,输入新的管理员密码 4. 选择 `Enable anonymous access` 允许匿名访问 ## 仓库浏览 登录后,默认在 `Welcome` 页面,点击页面左侧的 `Browse` 即可看到现有的仓库,列表中有如下字段 - `Name`:名称 - `Type`:类型,有如下三种 - `proxy`:这是代理方式,用来代理中央仓库,例如依赖的包在本地仓库没有,就会到私服获取,私服没有的话,会到中央仓库先把包下载到这里,然后再下载到本地仓库; - `hosted`:指的是公司或团队内部的包,并且 `hosted` 类型的仓库会分为 `releases` 和 `snapshots` ,前者是正式版,后者开发测试版; - `group`:它的目的就是把多个仓库组合起来,然后项目中只需要配置上这个类型的仓库地址,就可以把它里面组合的几个仓库都关联上。 - `Format`:格式, `nexus` 不仅可以做 `maven` 私服,还可以做其他的,例如 `npm` 、 `yum` 等 - `Status`:状态 - `URL`:仓库访问地址,点击 `copy` 按钮,就可以获取地址 ## 系统设置 点击页面上方导航栏内的 **设置(小齿轮)** 按钮,即可进入系统管理菜单,主要使用以下功能 - `Repository`:仓库。管理存储位置、具体仓库等 - `Security` :安全。管理用户、角色、权限等 ### 仓库管理 这里只需要用到两个功能 - `Repositories` :仓库。管理具体的仓库 - `Blob Stores` :存储。配置本地或远程存储位置 #### 存储 点击 `Blob Stores` 进入管理,页面字段如下 - `NAME` :仓库名称 - `TYPE` :存储类型。一般为 `File` 本地存储 - `STATE` :状态 - `BLOB COUNT` : 文件统计。不知道统计的是文件数量还是啥 - `TOTAL SIZE` :总文件大小 - `AVAILABLE SPACE` : 剩余可用空间 默认的 `default` 可以直接使用。 > 如何新建存储? 1. 点击右上角 `Create Blob Store` 开始创建 2. `Tpye` 类型选择 `File` ,即本地存储。 `S3` 类型的暂时不知道咋用 3. `Name` 存储名称自定义输入,建议纯小写字母 4. `Soft Quota` 存储空间配额,暂时无需配置,若配置后有如下选项 1. `Constraint Type` 约束类型,可选以下配置 - `Space Remaining` 剩余空间 - `Space Used` 使用空间 2. `Constraint Limit (in MB)` 限制(单位:MB) #### 仓库 - 默认的 `nuget` 仓库没啥作用,可以点击进行编辑,然后选择左上角 `Delete repository` 删除 - 默认的 `maven` 仓库也有点问题,全部删除,然后根据下面的教程重新创建 > 如何新建仓库? 创建以下仓库时,在 `Storage(存储)` 选项下有两个通用的步骤,一定要配置! 1. 如果有多个存储库,在 `Blob store:` 下面的下拉框中指定存储库(一般选择同一个库) 2. 在 `Strict Content Type Validation:` 严格的内容类型验证的下面取消勾选 `Validate that all content uploaded to this repository is of a MIME type appropriate for the repository format` 验证上传到此存储库的所有内容是否具有与存储库格式相适应的MIME类型 开始创建仓库 1. 创建代理仓库(国内加速) 1. 点击 `Create repository` 创建仓库 2. 选择 `maven2 (proxy)` 类型 3. 在 `Name` 名称处填写仓库名称。例如:`maven-aliyun` 4. 在 `Version policy:` 下面的下拉框中选择 `Mixed` 混合 5. 在 `Remote storage:` 远程仓库地址填入国内 `maven` 镜像地址,例如阿里源: `https://maven.aliyun.com/repository/public` 6. 其他保持默认,点击页面最下方的 `Create repository` 完成创建 2. 创建代理仓库(中央仓库) 1. 点击 `Create repository` 创建仓库 2. 选择 `maven2 (proxy)` 类型 3. 在 `Name` 名称处填写仓库名称。例如:`maven-center` 4. 在 `Version policy:` 下面的下拉框中选择 `Mixed` 混合 5. 在 `Remote storage:` 远程仓库地址填入 `maven` 中央仓库地址: `https://repo1.maven.org/maven2/` 6. 其他保持默认,点击页面最下方的 `Create repository` 完成创建 3. 创建内部正式仓库 1. 点击 `Create repository` 创建仓库 2. 选择 `maven2 (hosted)` 类型 3. 在 `Name` 名称处填写仓库名称。例如:`max-maven-releases` 4. 点击 `Create repository` 完成创建 4. 创建内部快照仓库 1. 点击 `Create repository` 创建仓库 2. 选择 `maven2 (hosted)` 类型 3. 在 `Name` 名称处填写仓库名称。例如:`max-maven-snapshots` 4. 在 `Version policy:` 下面的下拉框中选择 `Snapshot` 快照 6. 点击 `Create repository` 完成创建 5. 创建组合仓库 1. 点击 `Create repository` 创建仓库 2. 选择 `maven2 (group)` 类型 3. 在 `Name` 名称处填写仓库名称。例如:`max-maven-public` 4. 在 `Version policy:` 下面的下拉框中选择 `Mixed` 混合 5. 在 `Member repositories:` 成员仓库的筛选框中将上文创建的四个仓库移动到右侧,并调整成员的顺序<br>一般情况下,内部正式仓库第一,内部快照仓库第二,国内镜像第三,中央仓库第四 6. 点击 `Create repository` 完成创建 ### 安全管理 主要用于创建用户授予权限等操作,还没摸索明白 目前已知的功能是:创建两个用户,授予不同的仓库权限,一个用户(如组长)仅允许发布正式仓库,一个用户(如组员)仅允许发布快照仓库 PS:不知道怎么配,权限角色很多,挺烦的,懒得弄了,后面有时间更新 # nexus 使用 完成上文额配置后,就可以在本地使用这个私服了 ## 使用私服代理仓库 1. 打开本地 `maven` 的 `settings.xml` 配置文件 2. 在 `<mirrors></mirrors>` 标签内插入如下内容,其中 `id` 可以自定义。如果已配置其他镜像地址,需要删掉,只保留私服的地址 ```xml <mirror> <id>max-maven-public</id> <mirrorOf>*</mirrorOf> <url></url> </mirror> ``` 3. 打开 `nexus` 的 `browse` 仓库浏览页面,点击组合仓库的 `copy` 按钮,在弹出的窗口内复制地址,并粘贴到上文的 `url` 标签内,最终示例如下 ```xml <mirror> <id>max-maven-public</id> <mirrorOf>*</mirrorOf> <url>http://192.168.220.101:8081/repository/max-maven-public/</url> </mirror> ``` 4. 测试可用性 1. 将本地 `maven` 的 `repository` 仓库文件夹删除(可以先压缩备份一下) 2. 随便找一个可用的项目,在 `cmd` 界面中执行 `mvn clean package` 打包命令 3. 观察文件的下载地址,如果显示为私服地址(例如 `Downloading from max-maven-public: http://192.168.220.101:8081/repository/max-maven-public/`)且能够正常打包,即配置正常 4. 也可以打开 `nexus` 的 `browse` 仓库浏览页面,点击代理仓库,查看文件内容 5. 在 `idea` 、 `eclipse` 等开发工具的 `maven` 设置中,使用该 `settings.xml` 文件即可 ## 使用私服内部仓库 ### 发布 jar 包 #### 本地 `maven` 配置 1. 打开本地 `maven` 的 `settings.xml` 配置文件 2. 在 `<servers></servers>` 标签内配置如下内容,其中 `id` 可以自定义,用户名密码是 `nexus` 的用户名密码 ```xml <server> <id>max-nexus</id> <username>admin</username> <password>123</password> </server> ``` #### 执行发布 1. 打开需要 **发布** `jar` 包的项目的 `pom.xml` 2. 添加 **发布配置** 与 **源码打包插件** ,完整的示例如下 ```xml <?xml version="1.0" encoding="UTF-8"?> <project xmlns="http://maven.apache.org/POM/4.0.0" xmlns:xsi="http://www.w3.org/2001/XMLSchema-instance" xsi:schemaLocation="http://maven.apache.org/POM/4.0.0 http://maven.apache.org/xsd/maven-4.0.0.xsd"> <modelVersion>4.0.0</modelVersion> <groupId>com.maxqiu</groupId> <artifactId>test</artifactId> <!-- 如果要上传到正式仓库,不能以 -SNAPSHOT 结尾 --> <!-- 如果要上传到快照仓库,必须以 -SNAPSHOT 结尾,且必须大写,也不能缺少 - 符号 --> <version>1.0-SNAPSHOT</version> <properties> <!-- 修改 mvn 编译的默认编码 --> <project.build.sourceEncoding>UTF-8</project.build.sourceEncoding> <project.reporting.outputEncoding>UTF-8</project.reporting.outputEncoding> </properties> <!-- 发布配置 --> <distributionManagement> <!-- 正式仓库 --> <repository> <!-- 配置在 setting.xml 中 servers 标签下的 server 的 id --> <id>max-nexus</id> <!-- 正式仓库地址 --> <url>http://192.168.220.101:8081/repository/max-maven-releases/</url> </repository> <!-- 快照仓库 --> <snapshotRepository> <!-- 配置在 setting.xml 中 servers 标签下的 server 的 id --> <id>max-nexus</id> <!-- 正式仓库地址 --> <url>http://192.168.220.101:8081/repository/max-maven-snapshots/</url> </snapshotRepository> </distributionManagement> <build> <plugins> <!-- 源码打包插件 --> <plugin> <groupId>org.apache.maven.plugins</groupId> <artifactId>maven-source-plugin</artifactId> <version>3.2.1</version> <executions> <execution> <id>attach-sources</id> <phase>verify</phase> <goals> <goal>jar-no-fork</goal> </goals> </execution> </executions> </plugin> </plugins> </build> </project> ``` 3. 执行 `mvn clean deploy` 发布,即可上传 4. 打开 `nexus` 的 `Browse` 仓库浏览页面,点击内部正式仓库或内裤快照仓库,查看文件内容,或者点击 `Search` 输入关键字搜索即可 5. 坐标说明:即 `groupId` 、 `artifactId` 、 `version` ,下文简称 `gav` - 正式版:发布后,`gav` 坐标就是发布时当前项目的坐标,例如:<br/> - 快照版:发布后,`version` 中的 `SNAPSHOT` 会被以以下格式替换 `yyyyMMdd.HHmmss-index` ,其中 `index` 是自增序号,即 `xxxx-yyyyMMdd.HHmmss-index` ,例如:<br/> ### 引入 jar 包 下载时,不需要配置 `nexus` 的用户名密码 #### 正式版 1. 打开需要 **引入** `jar` 包的项目的 `pom.xml` 2. 在 `<dependencies></dependencies>` 添加对应的 `gav` 坐标并刷新项目即可(前提是已经配置了私服源) #### 快照版 1. 默认情况下 `maven` 不允许下载快照版 `jar` 包,需要额外的配置 2. 以下 **全局** 或 **指定项目** 二选一即可,推荐 **全局** 3. 配置完成后在引入 `gav` 即可, `version` 根据实际情况选择 - 写 `xxxx-SNAPSHOT` 时,每次刷新后会自动获取最新版 - 写 `xxxx-yyyyMMdd.HHmmss-index` 时 ,会引入指定发布时间的包 > 全局 打开本地 `maven` 的 `settings.xml` 配置文件,添加如下内容 在 `<profiles></profiles>` 标签内添加如下内容 ```xml <profile> <id>active-snapshot-profile</id> <repositories> <repository> <!-- ID随便写,但是不能没有 --> <id>snapshot</id> <!-- url 填 * 可以防止仓库地址变更,比如换服务器了 --> <url>*</url> <!-- 快照版配置 --> <snapshots> <!-- 开启快照 --> <enabled>true</enabled> <!-- 自动更新至最新版 --> <updatePolicy>always</updatePolicy> </snapshots> <!-- 如果仓库的正式版也允许重新部署(不建议),需要打开如下注释 --> <!--<releases> <enabled>true</enabled> <updatePolicy>always</updatePolicy> </releases>--> </repository> </repositories> </profile> ``` 在 `<settings></settings>` 标签内添加如下内容(一般就跟在 `profiles` 标签后面) ```xml <activeProfiles> <activeProfile>active-snapshot-profile</activeProfile> </activeProfiles> ``` > 指定项目 在需要 **引入** `jar` 包的项目的 `pom.xml` 内 `<project></project>` 添加下文的内容 ```xml <repositories> <repository> <!-- ID随便写,但是不能没有 --> <id>snapshot</id> <!-- url 填 * 可以防止仓库地址变更,比如换服务器了 --> <url>*</url> <!-- 快照版配置 --> <snapshots> <!-- 开启快照 --> <enabled>true</enabled> <!-- 自动更新至最新版 --> <updatePolicy>always</updatePolicy> </snapshots> <!-- 如果仓库的正式版也允许重新部署(不建议),需要打开如下注释 --> <!--<releases> <enabled>true</enabled> <updatePolicy>always</updatePolicy> </releases>--> </repository> </repositories> ```
247
全部评论